Excel Formula Help - Creating an Invoice with dropdowns (Part 2 - Locking the sheet)
In an earlier blog we looked at how to use the Data validation tool to create dropdowns for easy and accurate form filling.
In this blog, we will continue with our invoice and this time look at a way of locking the spreadsheet so that certain cells cannot be changed. In this way, we add a level of security to data processing.
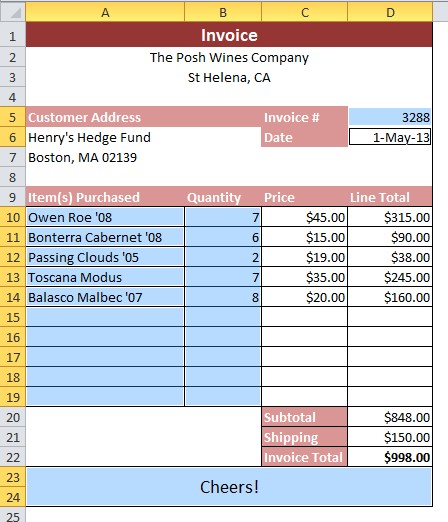
With our last invoice it was possible to place any price in the Price column. A bottle of Malbec 2007 costing $20, for example, could be either mistakenly or maliciously entered as costing $45. When multiplied by the quantity field this could result in a significant over (or, conversely, under) charge, as can be seen in this example:

What we need to do is find a way for Microsoft Excel to lock the cells that contain prices and totals so that these fields cannot be overwritten.
In Excel, all cells are by default locked, which sounds strange until you realize that actually getting the cells locked requires enabling "Protection" on the sheet as a whole. Furthermore, as Protection initiates locking of all 'locked' cells, we need to format the cells we don't want to be locked, so that they are 'unlocked' before we get to the Protection stage. This concept can be confusing at first so let's walk through the process.
Let's first select the cells that we would like users to be able to edit. They will be the drop downs, so that the various bottles of wine can be chosen and the adjacent Quantity fields. We also need our users to be able to change the invoice number, the date and have the option to change the comment at the bottom. The easiest way to select multiple non-contiguous cells is to hold down Ctrl and slect whichever cells we need.
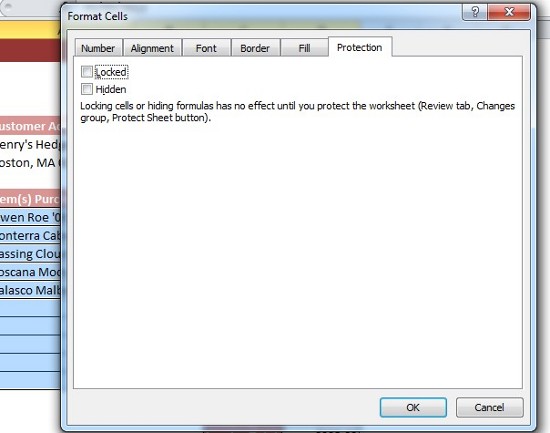
The next step is to format the selected cells so that they do not become locked during th "Protection" phase which is coming up next. This is done by right clicking on the selected cells, selecting Format cells and in the Format Cells options box, select the Protection tab.
There we are told what we already know, that 'Locking cells or hiding formulas has no effect until you protect the worksheet.. [..]..'. So, as all cells in Excel are already 'locked' by default, enabling protection will lock all of them. In which case, we need to select the cells we do not want to be locked (which we have done) and unlock them - in other words, on this tab, uncheck the Locked checkbox, and hit OK.
Click off the formatted area so that cells are no longer selected.
We now move to the Review ribbon and on the Changes pane click on Protect Sheet:
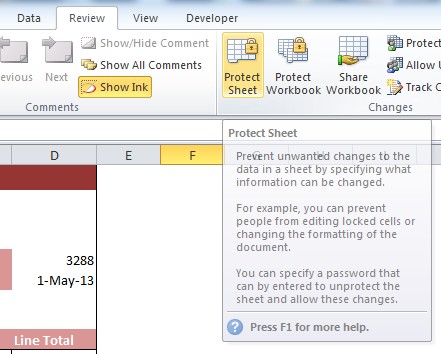
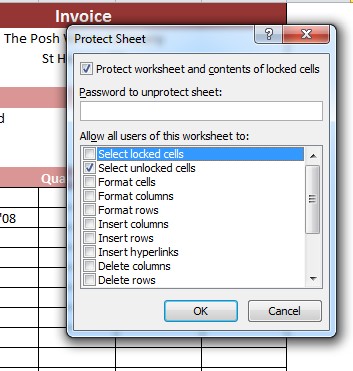
Here we have a few more choices; We can add a password but more importantly we can define exactly which cells users are allowed to select and edit. By default, the first two check boxes are usually ticked. If this is the case, un-check Select locked cells and hit OK:
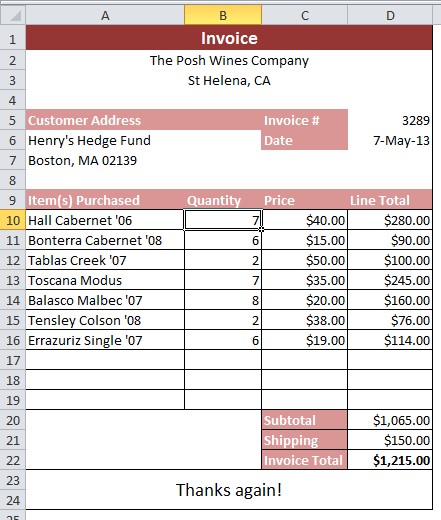
Once this is done, our invoice sheet is ready for the production folder. The cells we selected can be edited and changed, as can be seen below; however, no other cells can be accessed.
For more help and advice on securing your worksheets, contact our experts.